
LinkVector is an internal linking tool that provides comprehensive solutions to meet your internal linking needs, from auditing links to automatically fixing issues and more.
With an array of functionalities, you’re probably wondering where to start. We’ve got you covered.
This tutorial will give you a quick overview of all LinkVector’s features and modules, so you can get started right away.
If you prefer video instructions, you can watch the tutorial video below: LinkVector 101: Quick Start Tutorial
Let’s get started.
Set up your project
This is the first screen you’ll see after activating your account. To set up your project, you’ll need to add information about the website you want LinkVector to crawl.
There are two ways to do this: Set up for WordPress (integration supported) and set up for other CMS (integration not yet supported).
Note: We currently support integration with WordPress and will support Hubspot and Webflow soon. With integrated CMS, we can make direct changes to your website like inserting links and fixing issues. With non-integrated CMS, you will have to manually apply the suggestions as we have no control over your website.
We aim to support more CMS platforms based on user demands, so feel free to let us know what CMS you use.
WordPress
To set up for WordPress, first, go to your WordPress and set up an Application password to connect it with LinkVector. Here’s a step-by-step:
- On your WordPress account, go to the Profile section on the sidebar.
- Scroll down to the Application Passwords section. (Note: If you do not see this section, you probably use Word Fence and have disabled this feature. To enable it, head over to Wordfence > All Options > Uncheck Disable WordPress application passwords > Save)
- Enter a descriptive name in the New Application Password Name field. This field is for internal use only and helps you recognize what the application password is connected to. For example, you can use “LinkVector”.
- Click on Add New Application Password. You will be shown a combination of numbers and letters.
- Copy and save this password in a safe location. You will NOT be able to retrieve it once you exit this page.
Once copied and saved, return to LinkVector and fill in all entry fields.
- Your WordPress site URL
- Username: Input the same username you used to log into WordPress
- Application Password: Paste the Application Password you generated in WordPress here
- Exclude URLs/Paths: You can exclude specific pages or paths that aren’t relevant for internal linking, such as category pages or About pages.
Note:
- Make sure there is no trailing slash in the URL (eg. https://website.com/)
- Make sure your WordPress Site URL is accurate. For example, if your WordPress domain configuration includes a “www” at the front, please make sure to include it.
Click ‘Create New Project’ and you’re all set.
Other CMS
For other CMS, simply enter your domain and sitemap.
If you don’t have a sitemap, you can use a plugin within your CMS or online generators that can generate a sitemap for you. You can also create a sitemap manually.
You can exclude specific pages or paths that aren’t relevant for internal linking, such as category pages or About pages.
Click ‘Create New Project’ to finish set up.
LinkVector might need 30-60 minutes to crawl your pages depending on your website’s size.
Dashboard
The dashboard summarizes your projects and gives quick access to resources and settings.
Inside the dashboard, you’ll find:
- Project Overview: View the status of all projects connected to LinkVector.
- Cross-Domain Linking: Get an overview of links connected to other sites you own.
- Information Cards: Access LinkVector’s resources for tutorials and affiliate program.
- Action buttons at the top-right of the page that allow you to easily:
- Add a new project
- Join the referral program
- Upgrade your plan
- Access your account settings
- Sidebar

Sidebar
The sidebar lets you access different modules and features easily.
Within the sidebar, you can find:
- Domain: Select the domain property you want to work on
- Link Actions: Identify and fix internal linking issues
- All pages
- Get suggestions for suitable pages to link to and from a target page
- Visualize how different pages are connected to each other
- Link Insights: Get in-depth reports about your website’s internal linking
- Link Utilities: Configure rules to add links or replace links based on specified cases automatically
- Link History: Track linking activity done with LinkVector and revert necessary changes
- Project settings: Set up how you want LinkVector to crawl and analyze your domain, URLs, and pages.
Link Actions: Receive and Apply Suggestions to Fix Linking Issues
If your website has broken links and you don’t know what they are, how to fix them, or where they are, your site will start to break from the frustrated users and confused crawlers.
You can fix internal linking issues like broken links and more using LinkActions to pinpoint the problems, get tailored suggestions to fix them, and automatically implement them (only for integrated CMS).
Inside the LinkActions tab, you’ll find:
- List of issues: View a summary of the internal link issues found on your site and the total number of issues
- Site health score: Monitor your site’s health calculated by the number of issues found.
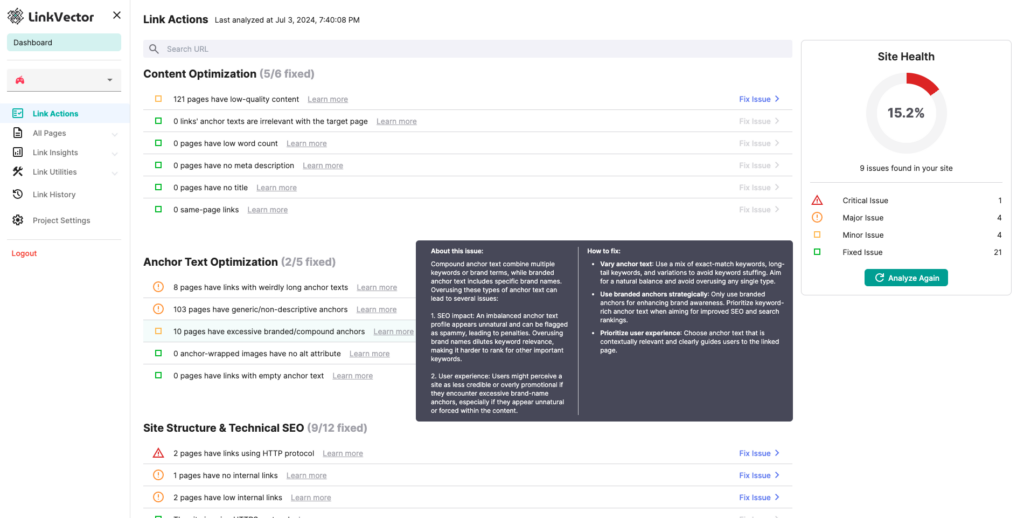
Hovering over ‘Learn More’ will trigger a pop-up that explains each issue and provides instructions on how to fix them.
To resolve an issue using LinkVector, click “Fix Issue.”
Fixing an issue with LinkActions
Inside the “Fix Issue” tab, you can view all issues along with
- Source of issue: Depending on the issue, it can be page URL or anchor text
- Information cards: Learn more about the issue, how to fix it, and access related resources from Google.
- Page Link Score: An indication of a page’s importance and influence on your website. A higher Page Score means the page is more valuable and important for your site’s SEO. Page Link Score is calculated using a combination of PageRank and Internal Link Rating (ILR).
- PageRank measures the value of a page based on the quantity and quality of links pointing to it from other pages, indicating its popularity and significance.
- Internal Link Rating (ILR) measures how well-connected a page is within your site by considering the number of incoming links and the click depth.
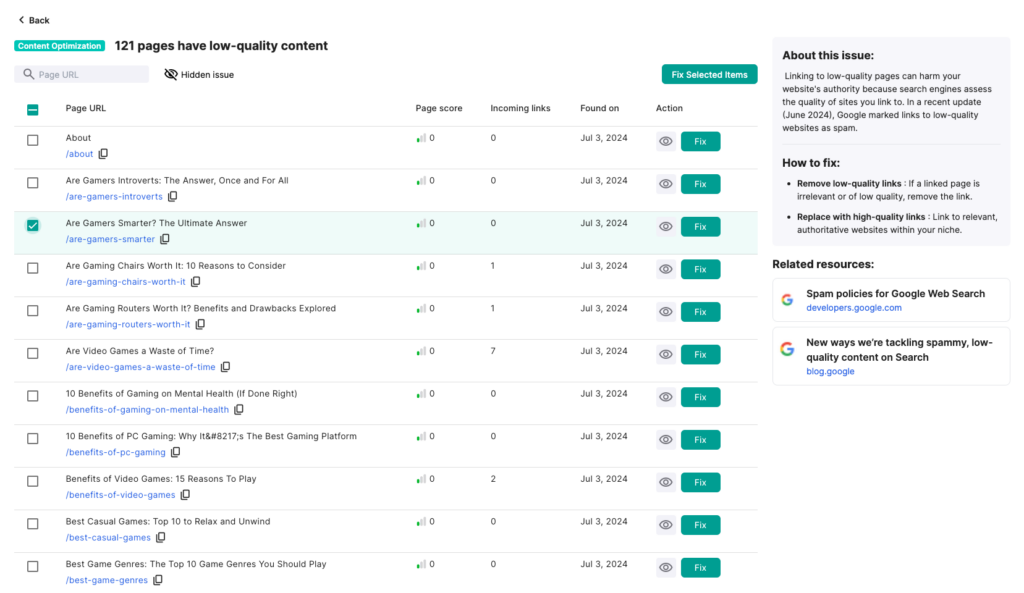
To fix the issues, select and click “Fix Selected Items,” or click “Fix” next to each individual item.
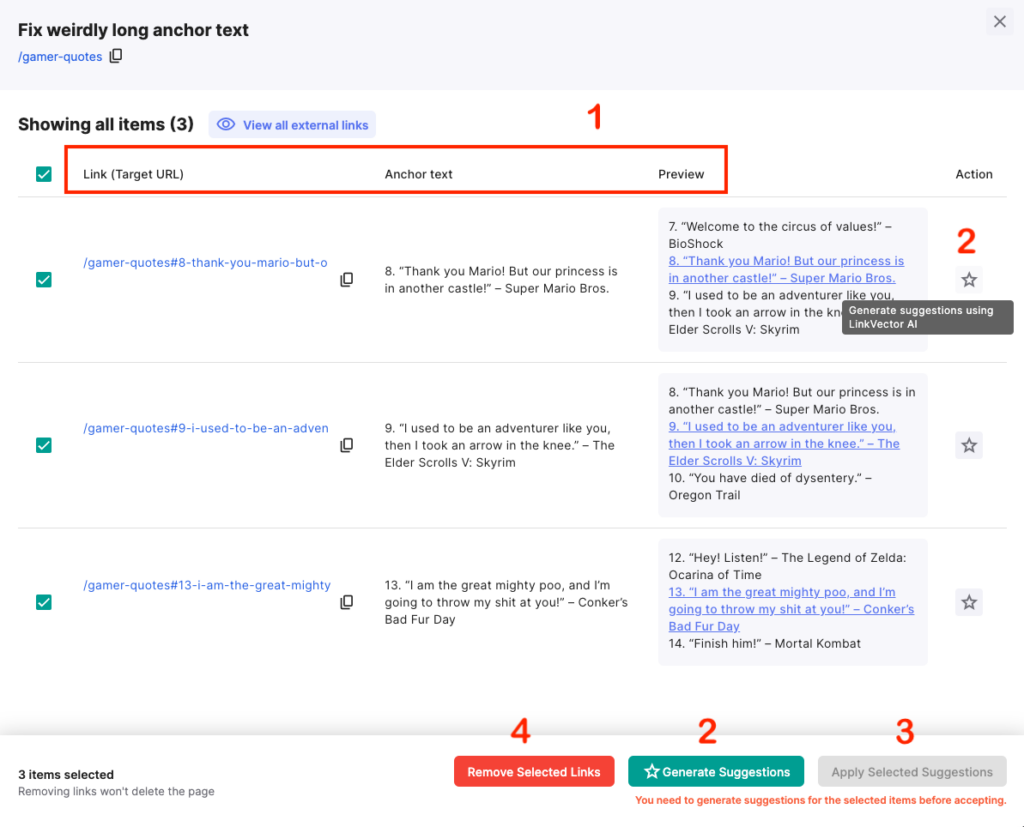
These will trigger an action window. From the window, you’ll be able to
- Pinpoint and preview each issue on your site
- Generate tailored suggestions for fixing them
- Apply the suggested fixes, or
- Remove the items
All Pages: Identify Suitable Pages for Inbound and Outbound Links
All Pages tab crawls your pages to provide linking suggestions and visualize how internal links connect them.
All Pages offers two features to help you do so: page listing and visual map.
Page Listing
Page listing helps you get linking suggestions to and from your site’s pages.
Inside the tab, you can:
- Page log: See a record of all pages crawled on your site
- Search bar: Find specific pages
- Quick View: Quickly view a list of pages without using the search bar
- Page overview: View the summary of a page’s status by clicking on the list
- Incoming links: View the number and source of URLs pointing to the target page
- Outgoing links: View the number and source of URLs pointing from the target page
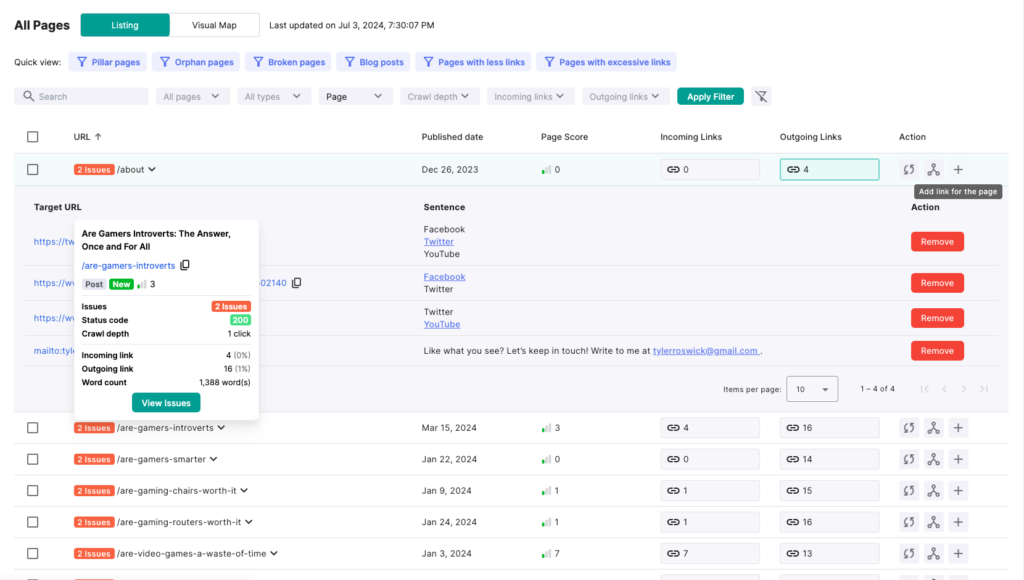
To get linking suggestions for a page, click ‘+’ on the Action column to open an action window.
To apply the suggestions:
- Review the target page or URL.
- Check the use of anchor text within the sentence.
- Add the link for a single selection.
- Add all selected links for bulk selection.
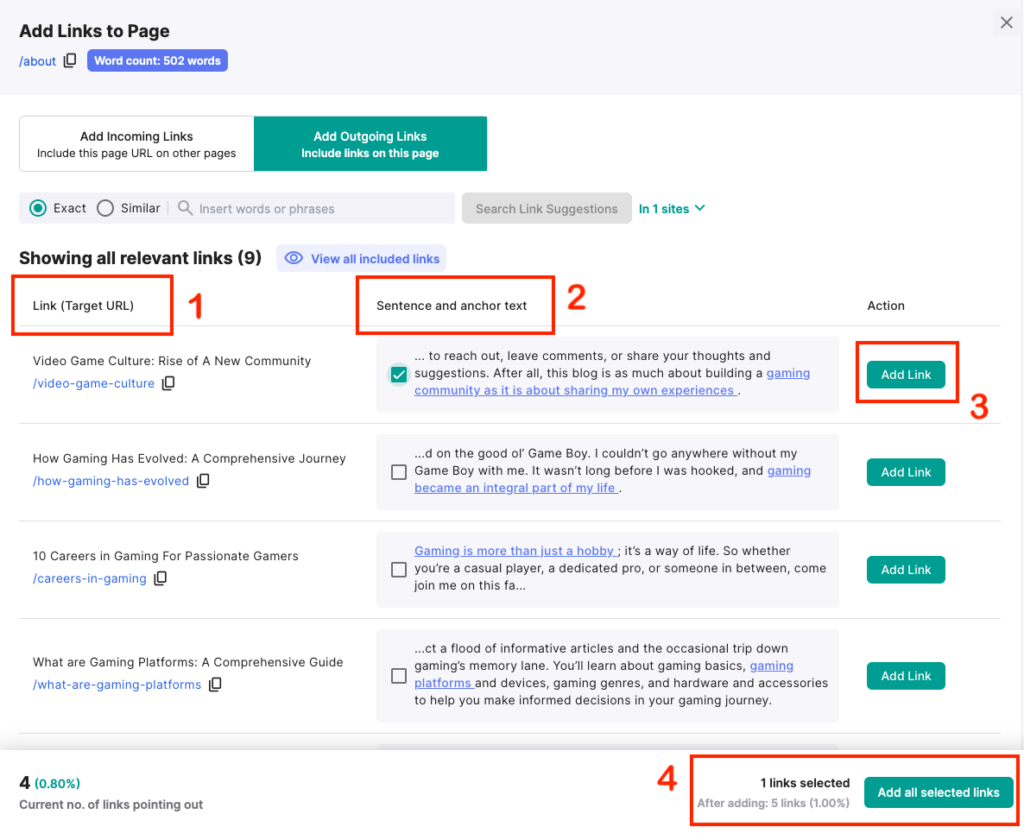
Alternatively, you can search link suggestions by specifying words or phrases to which you want to add a target URL.
Visual Map
With Visual Map, you can visualize how pages on your site are connected to each other and create new connections by adding links directly from the map.
Inside the visual map you’ll be able to:
- Map canvas: View, pan, and zoom your displayed map
- Search bar: Search pages to display as a map on the canvas
- View preferences sidebar: Set up what type of data you want the visual map to display
- Line setting: Arrowed line represents direction; line represents connection
- Node setting: Node can be labeled as URL slug or page title
- Crawl depth setting: Choose a crawl depth level to map pages within the specified depth
- Page type setting: Select page type to be displayed
- Page overview: View the summary of a page’s information by hovering on a node
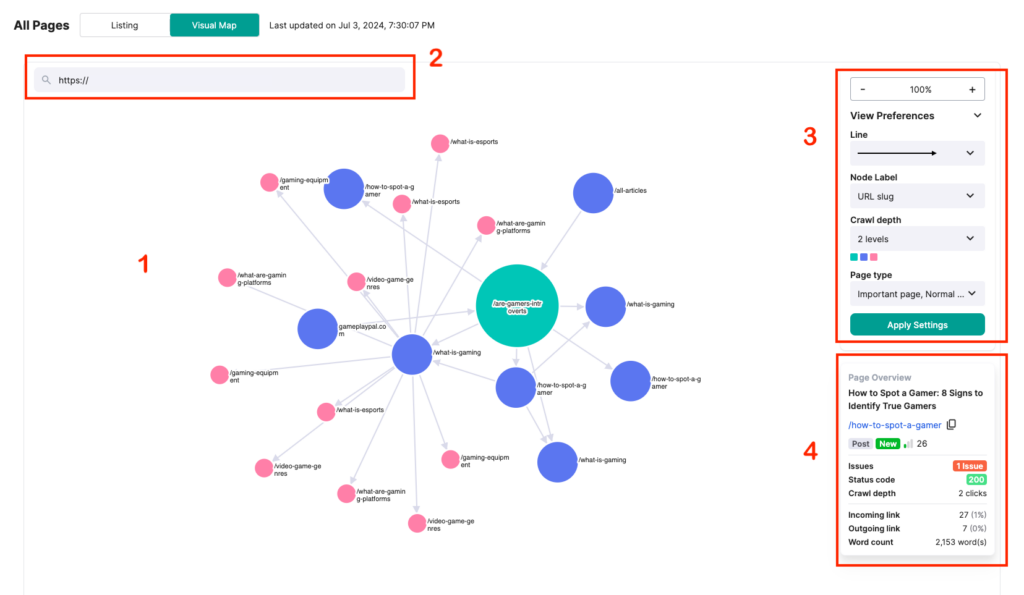
You can get linking suggestions for two pages you wish to connect automatically by:
- Clicking on a node (source page)
- Hovering to another node (target page). Ensure that a red dashed-arrow line follows your cursor.
- Click the target node to trigger an action window
To apply the suggestions in the action window, you can refer to the same steps on Page Listing.
Link Insights: Monitor Your Internal Linking Performance
Underperforming internal links will hurt your ranking, and it’s even worse if you don’t realize they’re underperforming due to a lack of clear data.
You can monitor your site’s internal link performance using the data from LinkInsights.
There are three sections within the LinkInsights tab: Site Overview, Domains, and Anchor texts.
Each section helps you monitor different aspects of internal link optimization.
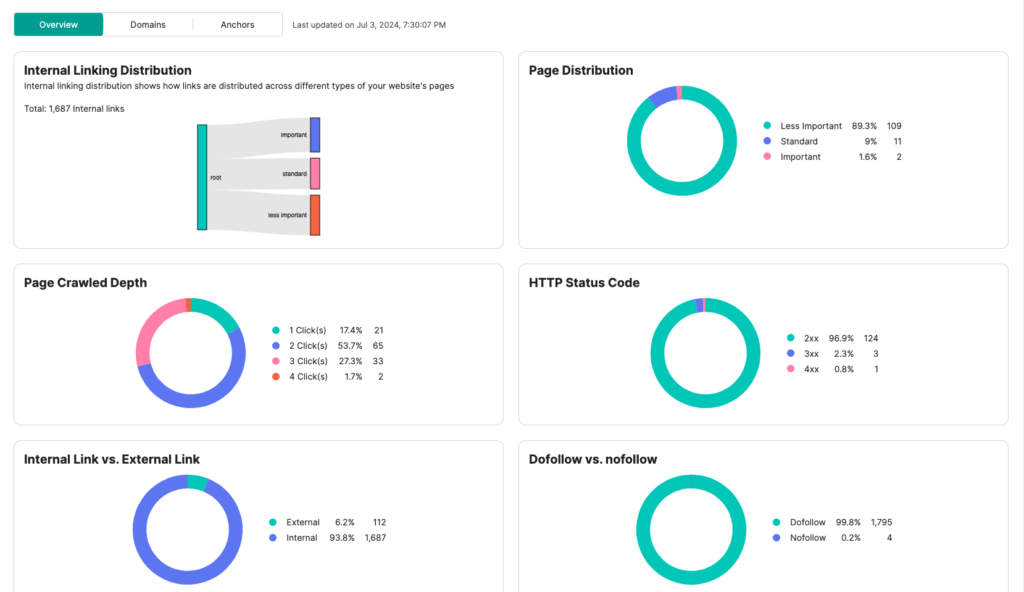
Site Overview
Site Overview allows you to gauge the overall status and performance of your internal links through easy-to-digest charts. You can see how your internal links are distributed across various data.
Domains
You can view a list of the top pages you are linking to and from.
Inside, you’ll find a list of domains along with the total number of “Point From” and “Point To” links for each domain.
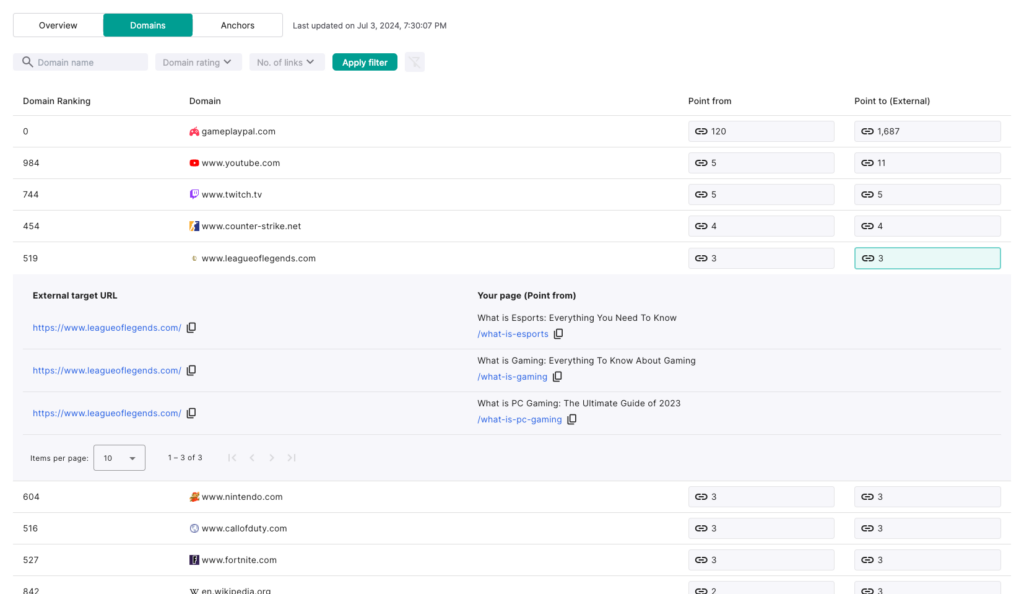
To break down the totals, click on the numbers. You’ll see:
- Point From: A list of the top pages on your site that link to the target domain’s pages. If the number shows 5, you’ll see the 5 pages with the most links pointing to the target domain.
- Point to: A list of all the target domain’s pages that your site is linking to. If the number shows 11, you’ll see 11 of your pages linking to 11 target pages.
Anchor Texts
The Anchor Texts section allows you to observe how well-optimized the anchor texts on your site are. Within this section, you can see:
- Anchor Text Distribution: View the different types of anchor texts used and their frequency.
- Item Log: See where specific anchor texts are used and how they appear in the exact sentence.
- Anchor Text: View the anchor text.
- Target URL: View the link that the anchor text directs to.
- Links to Target: View the number of times the anchor text links to the target URL.
- Source URL: Locate the page where the anchor text is used.
- Sentence: Locate the sentence where the anchor text is used.
- Anchor Type: Identify the type of anchor text.
- Action: Remove the target URL embedded in the anchor text.

Link Utilities: Set Up Link Rules For Automation & Replace Links in Bulk
If you produce content at a high volume, then you’ll know; manually adding the same links to new content and replacing old links with updated ones are heavy work.
With Link Utilities, you can automatically add or replace links when a specific case is met.
You can achieve this using two features: Link Replacement and Link Rules.
Link Replacement
Link Replacement allows you to replace links or anchor text across your entire website easily. That include obsolete, redirected, broken, internal, and external links.
The Link Replacement dashboard will show you the following:
- Search bar: Search links or anchor text to be replaced and click ‘Find URL’
- Replacement log: Track all replaced links or revert if needed
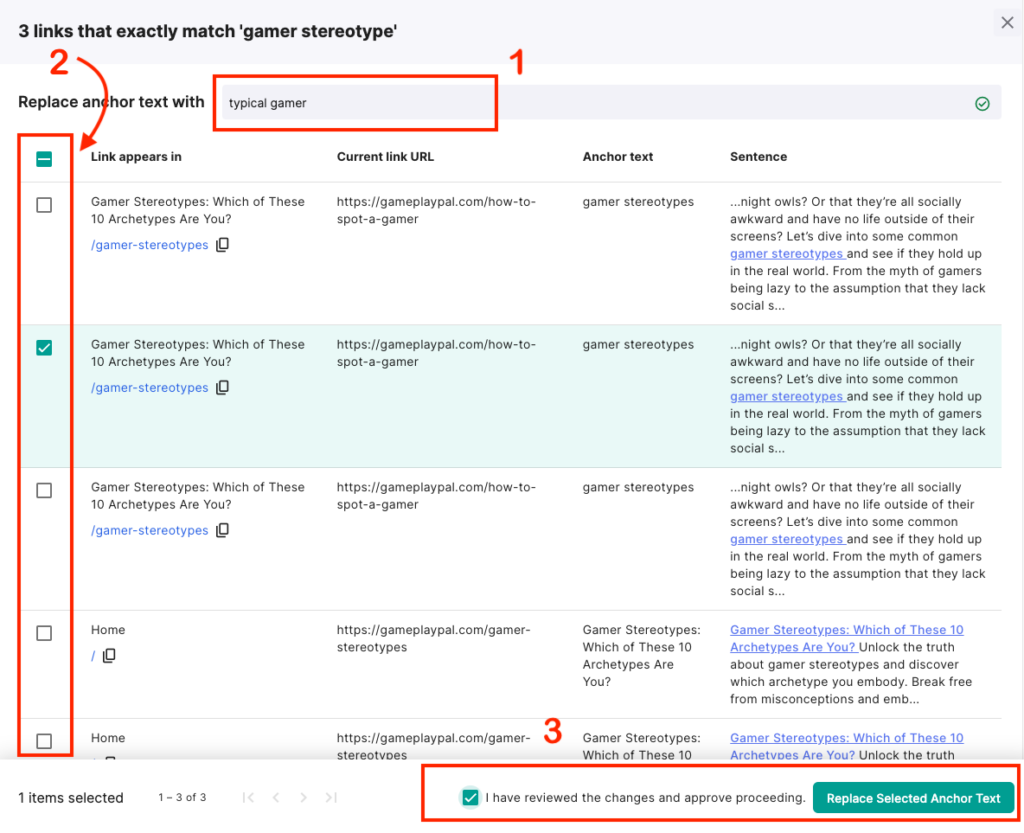
To replace links or anchor text, enter the URL or anchor text in the search bar and click ‘Find URL’. From the action window, you can proceed by:
- Inserting the new link or anchor text
- Selecting which case to apply the new link on
- Replacing selected links
Link Rule
Link Rule lets you set a rule to automatically add links to a new content when it meets specific criteria.
A link rule can be created when you want to, for example:
(1) Add URL www.thefoodorganik.com to (2) anchor text containing phrases XX, YY and ZZ found on (3) page path /blog
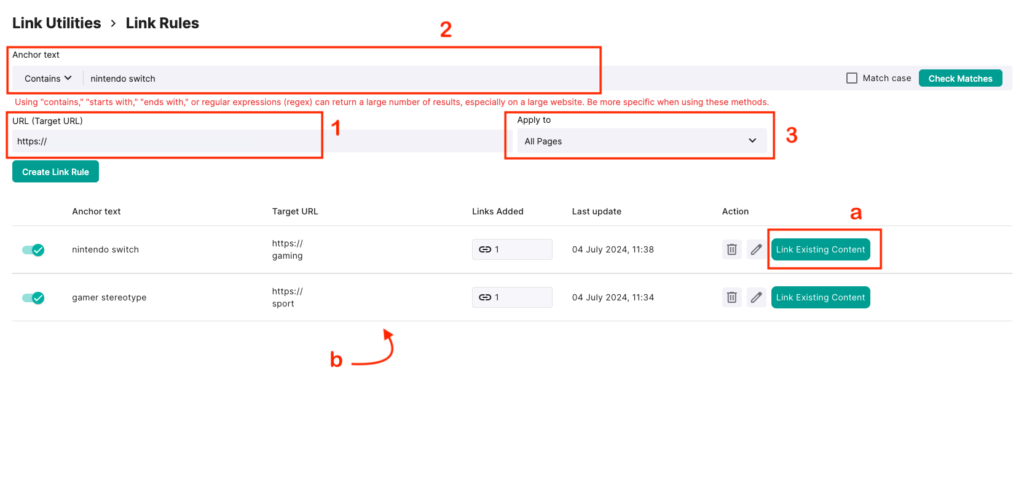
Once a rule is created, you can:
a. Get suggestions for specific pages to apply rules and review them
b. Track and manage all rules, including deleting or disabling them
Link History: Record and Revert Linking Activity
With hundreds of pages and internal links, it’s difficult to track all changes. You might overlook mistakes and struggle to remember the original state before making changes.
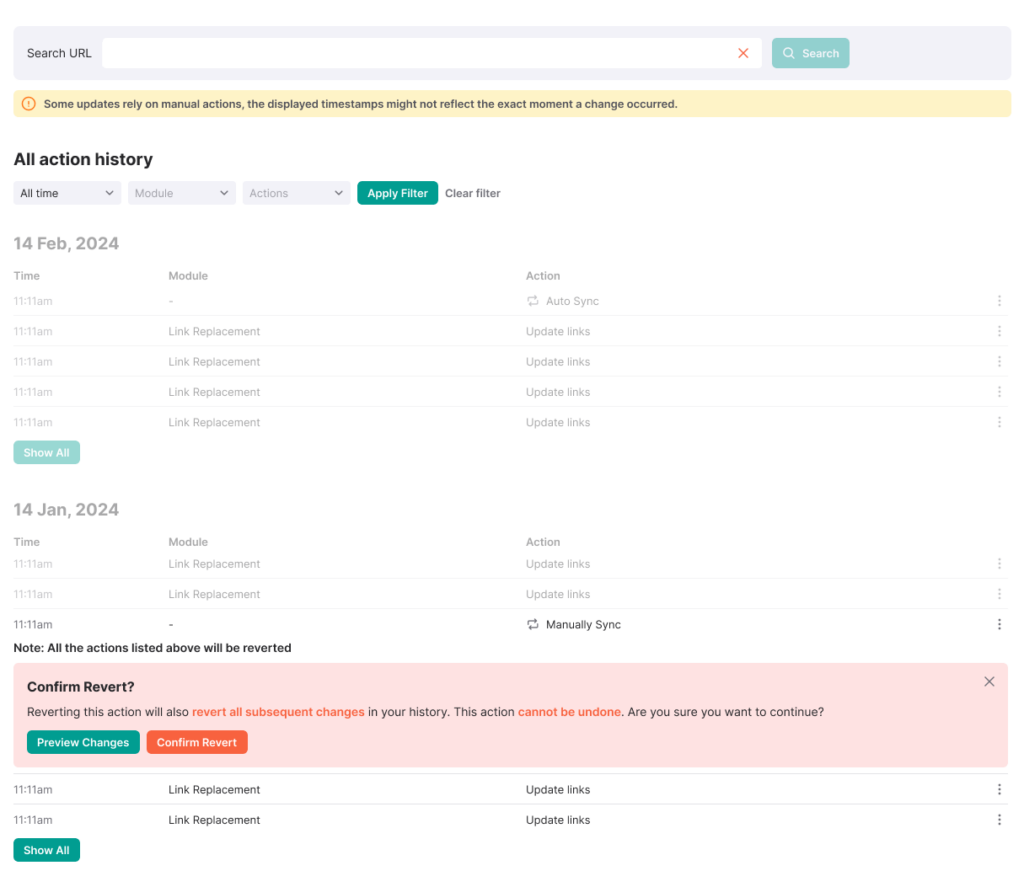
Link History records all internal linking activity within your site and provides the option to revert changes.
Inside the tab, you’ll be able to
- Search Bar: Search for the history of activities or changes made to a URL.
- History Log: View a summary of pages with internal linking activities recorded in the last 30 days.
- View History: View a list of all actions taken on the target URL and revert them if needed.
To revert an action or changes made in LinkVector, you can
- Click View History
- Click an entry from the list
- Preview changes before and after the revert
- Confirm the revert and apply changes
Project Settings
Project Settings is where you can configure and customize the settings and preferences of your project.
You’ll be able to:
- Project Details: Configure domain settings

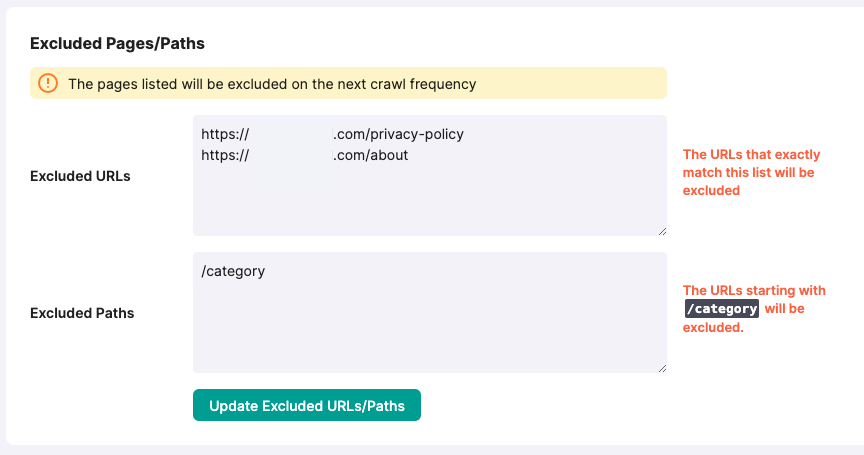
- Excluded Pages/Paths: Exclude specified pages or paths
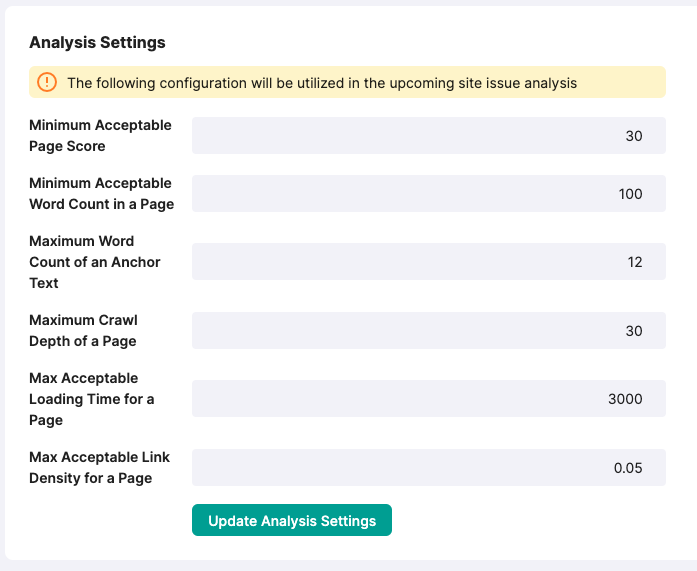
- Analysis Settings: Define when a page or anchor is considered problematic in the Link Actions module. If you wish to maintain the default Analysis settings, you can skip this.
- Minimum Acceptable Page Score: This sets the lowest page score (out of 100) that a page must have to be considered acceptable. Pages scoring below this threshold will be flagged as an issue in Link Actions
- Minimum Acceptable Word Count in a Page: This sets the minimum number of words a page must contain. Pages with fewer words than this threshold might be considered too thin in content and flagged for review.
- Maximum Word Count of an Anchor Text: This sets the maximum word count for the anchor to be considered a reasonable length. Anchor text that exceeds this value will be flagged as weirdly long by our algorithm.
- Maximum Crawl Depth of a Page: This is the tolerated crawl depth for a page. (a page exceeding this number will be considered as too deep)
- Max Acceptable Loading Time for a Page: This sets the maximum loading time (in milliseconds) for a page. Pages taking longer than this to load will be flagged for performance improvements.
- Max Acceptable Link Density for a Page: This sets the maximum ratio of links to total words on a page. Pages with higher link density will be considered spammy or cluttered and flagged for review.
Implement Precise Internal Linking With LinkVector
You’ve now mastered the core modules and features. It’s time to put your knowledge into practice. Dive in, test the different modules, and start optimizing your internal links.
Log in to the LinkVector app here: https://app.linkvector.io.
If you need help or have questions, write to our customer support at hello@linkvector.io.